
How to Install Sod: A Step-by-Step Guide
Author: Travis Chulick
Date: Feb 7th 2026
Installing sod is a 5-step process: 1) Kill and remove all existing grass and weeds. 2) Till the soil 4-6 inches deep and add 2-3 inches of compost. 3) Lay the sod in a staggered, brick-like pattern, ensuring tight seams. 4) Roll the entire lawn with a water-filled roller to ensure root-to-soil contact. 5) Water immediately and keep the sod and top inch of soil consistently moist for the first 14 days.
It's the most common mistake in landscaping. You spend a weekend—or three—prepping your yard. You watch a dozen videos. You buy the tools. You lay the sod. It looks perfect. A lush, green carpet, delivered. Then, a week later, the seams start to show. Yellowish-brown lines that trace the outline of each sod piece. Two weeks later, the corners are pulling up. The edges are crispy. The whole thing looks like a sad, patchwork quilt.
It feels less like a yard and more like a second job you're failing at.
Here's the truth: installing sod isn't hard, but it is unforgiving. It's a game of inches and minutes. One missed step, one shortcut, and the whole project can fail. But when you get it right, the result is instant, gratifying, and adds real value to your home.
This guide is your field manual. It's the professional's process, broken down for the first-time DIYer. We'll cover the 10 rules of sod installation, the 5 "Kill Steps" you can't skip, and the exact watering schedule to guarantee a healthy, beautiful lawn. Whether you're in Southwest Florida or Phoenix, these principles apply.
Product availability varies by region. Enter your zip code on our website to see which varieties are available in your area.
Your perfect lawn is achievable. Here's how to do it right the first time. And if you decide the DIY route isn't for you, you can always shop our full selection of sod and have it delivered right to your curb.
Table of Contents
- The 10 Rules of Sod Installation
- Project Checklist: Tools & Materials
- Step 1: The "Kill" Phase (Removing the Old Lawn)
- Step 2: Soil Preparation (The 90% Rule)
- Step 3: Laying the Sod (The Brick Pattern)
- Step 4: Rolling the Lawn (The Non-Negotiable Step)
- Step 5: The First Watering (The 30-Minute Rule)
- Post-Installation Care: The First 30 Days
- Common Rookie Mistakes to Avoid
- Final Thoughts: Is DIY Sod Installation Worth It?
- Key Takeaways
- FAQs: Your Sod Installation Questions, Answered
- References
The 10 Rules of Sod Installation
Think of these as the fundamental laws of sod. Violate them at your own risk.
- Green Side Up. (This is the only easy part.)
- You Cannot Install Sod Over Existing Grass. It will die. No exceptions.
- Soil Prep is 90% of the Work. The sod is only as good as the soil beneath it.
- Order 10% More Sod Than You Need. You'll lose yardage to cuts, curves, and mistakes.
- Your Sod is a Perishable Product. It must be installed within 24 hours in the summer, 48 hours max in the winter.
- The 30-Minute Rule is Not a Suggestion. The fine feeder roots on new sod can dry out and die in as little as 30 minutes on a hot, sunny day. Immediate watering is a requirement.
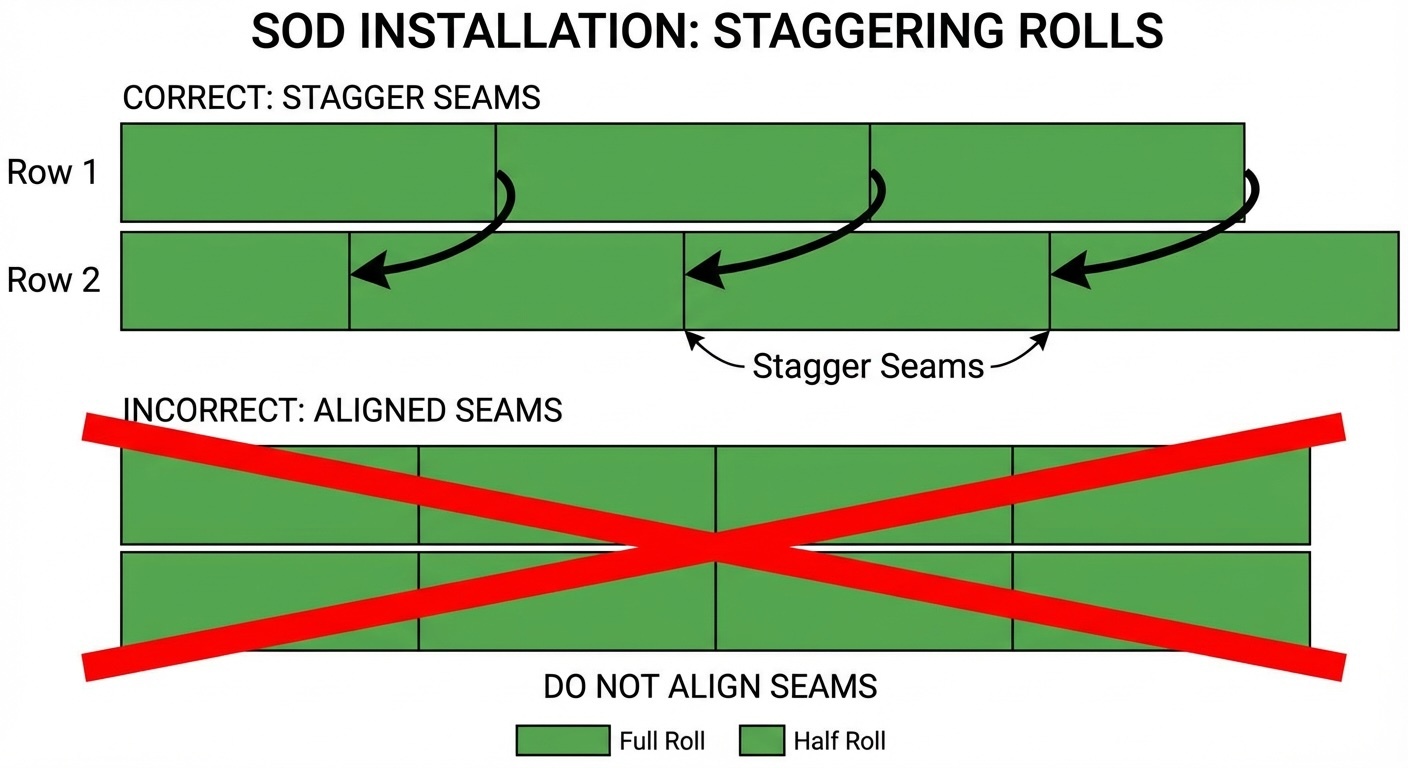
- Stagger the Seams. Always lay sod in a brick-like pattern.
- Roll the Sod. A water-filled roller is not optional. It's essential for root-to-soil contact.
- Stay Off the Lawn. Keep all foot traffic off the new sod for at least 14 days.
- The "Tug Test" is Your Guide. Don't mow until the sod can't be pulled up from the ground.
Project Checklist: Tools & Materials
Having everything on-site before the sod arrives is non-negotiable. Scrambling for a tool is how mistakes happen.
| Tool/Material | Purpose | Rental/Purchase | Notes |
|---|---|---|---|
| Sod Cutter | Removing old lawn | Rental ($70-$115/day) | Optional, but highly recommended for large areas. |
| Rototiller | Breaking up compacted soil | Rental ($50-$100/day) | Essential for proper soil preparation. |
| Landscape Rake | Grading and leveling soil | Purchase | An iron rake, not a flimsy leaf rake. |
| Sod Knife | Cutting sod pieces | Purchase | A carpet knife or utility knife also works. |
| Lawn Roller | Ensuring root-to-soil contact | Rental ($20-$30/day) | Must be filled with water (200-300 lbs). |
| Starter Fertilizer | Promoting root growth | Purchase | High-phosphorus formula (e.g., 18-24-12). |
| Compost | Amending the soil | Purchase (bulk delivery) | 2-3 cubic yards per 1,000 sq ft. |
| Sprinklers/Hoses | Watering | Purchase | Ensure you have enough to cover the entire area. |
| Wheelbarrow | Moving soil, compost, sod | Purchase | A contractor-grade wheelbarrow is best. |
| Work Gloves | Protecting your hands | Purchase | You'll be handling a lot of soil and sod. |
Step 1: The "Kill" Phase (Removing the Old Lawn)
This is the most satisfying and most critical first step. You must create a clean slate.
Your Goal: Remove every last bit of old grass, weeds, and debris.
Why it's a Kill Step: If you lay new sod over an existing lawn, the old grass will decompose, release heat, and create a slimy, anaerobic layer that will suffocate the new roots. The new sod will die. It's that simple.
Option A: Sod Cutter (Recommended)
A sod cutter is a gas-powered machine that slices under the grass, allowing you to roll it up like a carpet. It's fast, efficient, and gives you a clean surface.
- Set the Depth: Adjust the blade to cut just under the root layer, about 1-2 inches deep.
- Work in Parallel Lines: Cut long, straight strips across your lawn.
- Roll and Remove: Roll up the strips of old sod. They will be heavy. Use a wheelbarrow to transport them.
Option B: Non-Selective Herbicide
If you have more time, you can use a non-selective herbicide like glyphosate.
- Apply: Spray the entire lawn according to the manufacturer's instructions.
- Wait: It will take 7-14 days for the grass to die completely.
- Remove: Once the grass is brown and dead, you can remove it with a rake or sod cutter.
Warning: Always read and follow the safety instructions when using herbicides. Keep pets and children off the treated area until it is safe.
Step 2: Soil Preparation (The 90% Rule)
This is where the magic happens. The effort you put in here will determine the long-term health of your lawn. A common mistake is to simply rake the surface, but the real work is happening 4-6 inches below. This is where you build the foundation for a resilient, drought-tolerant lawn.
Your Goal: Create a 4-6 inch deep bed of loose, nutrient-rich soil for the new roots to grow into.
Why it's a Kill Step: Compacted soil is a wall. Roots can't penetrate it. Without deep roots, your lawn will be weak, prone to disease, and require constant watering. It will never thrive.
- Till the Soil: Using a rototiller, till the entire area to a depth of 4-6 inches. This breaks up compaction and aerates the soil.
- Add Organic Matter: Spread a 2-3 inch layer of high-quality compost over the tilled soil. This improves drainage, adds nutrients, and helps retain moisture.
- Incorporate the Compost: Till the compost into the soil, mixing it thoroughly.
- Apply Starter Fertilizer: Broadcast a high-phosphorus starter fertilizer over the entire area. This provides the essential nutrients for rapid root development.
- Final Grade: Use a landscape rake to create a smooth, level surface. The final grade should be about 1 inch below any adjacent sidewalks, driveways, or patios. This prevents the sod from being scalped by the mower.
Step 3: Laying the Sod (The Brick Pattern)
Now for the fun part. This is where your new lawn starts to take shape. The key here is speed and precision. Remember, your sod is a living, breathing plant that is under incredible stress. The faster you can get it laid and watered, the better its chances of survival.
Your Goal: Lay the sod in a staggered, brick-like pattern with tight seams.
Why it's a Kill Step: Laying sod in a grid pattern (like a checkerboard) creates channels where water can run off, eroding the soil and drying out the seams. Staggering the seams prevents this and creates a stronger, more unified lawn.
- Start with a Baseline: Find the longest straight edge in your yard (a driveway or sidewalk is perfect) and lay your first row of sod along it.
- Stagger the Next Row: Cut the first piece of your second row in half. Start this row with the half-piece, so the seams are staggered. This is the brick pattern.
- Keep Seams Tight: Push the edges of the sod tightly together, but don't overlap them. You shouldn't be able to see any soil between the pieces.
- Never Stretch the Sod: It's tempting to stretch a piece to make it fit. Don't. It will shrink back when it dries, creating gaps.
- Cut with a Sod Knife: Use a sharp sod knife or utility knife to cut pieces to fit around curves, sprinkler heads, and other obstacles.
Step 4: Rolling the Lawn (The Non-Negotiable Step)
This is the step most DIYers skip. It's also the reason many DIY sod installations fail.
Your Goal: Ensure perfect root-to-soil contact across the entire lawn.
Why it's a Kill Step: Air pockets between the sod and the soil are a death sentence for roots. If the roots can't touch the soil, they can't get water. They will dry out and die, and the sod will never take root.
- Rent a Roller: Get a lawn roller from your local rental store. It should be the type you can fill with water.
- Fill it Up: Fill the roller completely with water. You want it to be heavy (200-300 lbs).
- Roll the Entire Lawn: Go over the entire lawn, first in one direction, then in a perpendicular direction. You should be able to see the sod compress and settle into the soil.
Step 5: The First Watering (The 30-Minute Rule)
As soon as you're done rolling, it's time to water. And you need to be quick about it.
Your Goal: Apply enough water to saturate the sod and the top 2-3 inches of soil beneath it.
Why it's a Kill Step: The fine feeder roots on new sod can dry out and die in as little as 30 minutes on a hot, sunny day. Immediate watering is not a suggestion; it's a requirement.
- Water Immediately: Start watering the first section of sod you laid as soon as you're done with it, even if you haven't finished the whole lawn yet.
- Water Deeply: Apply at least 1 inch of water to the entire lawn. To check, place an empty tuna can on the lawn. When it's full, you've applied 1 inch of water.
- Check the Soil: After watering, lift a corner of the sod to ensure the soil underneath is saturated. It should be wet and muddy.
Post-Installation Care: The First 30 Days
Your job isn't done when the sod is laid. The first 30 days are critical for establishing a healthy, deep root system. This is the period when your lawn is most vulnerable. Your goal is to transition from a shallow-rooted, dependent plant to a deep-rooted, resilient lawn.
The Watering Schedule
Days 1-14: Keep it Wet
- Goal: Keep the sod and the top inch of soil consistently moist. Never let the roots dry out.
- Schedule: Water 2-4 times a day for short periods (10-15 minutes).
- The Test: The soil under the sod should feel like a damp sponge.
Days 15-30: Deep and Infrequent
- Goal: Encourage the roots to grow deeper into the soil in search of water.
- Schedule: Water every other day for a longer duration (30-45 minutes).
- The Test: The soil should start to dry out slightly between waterings.
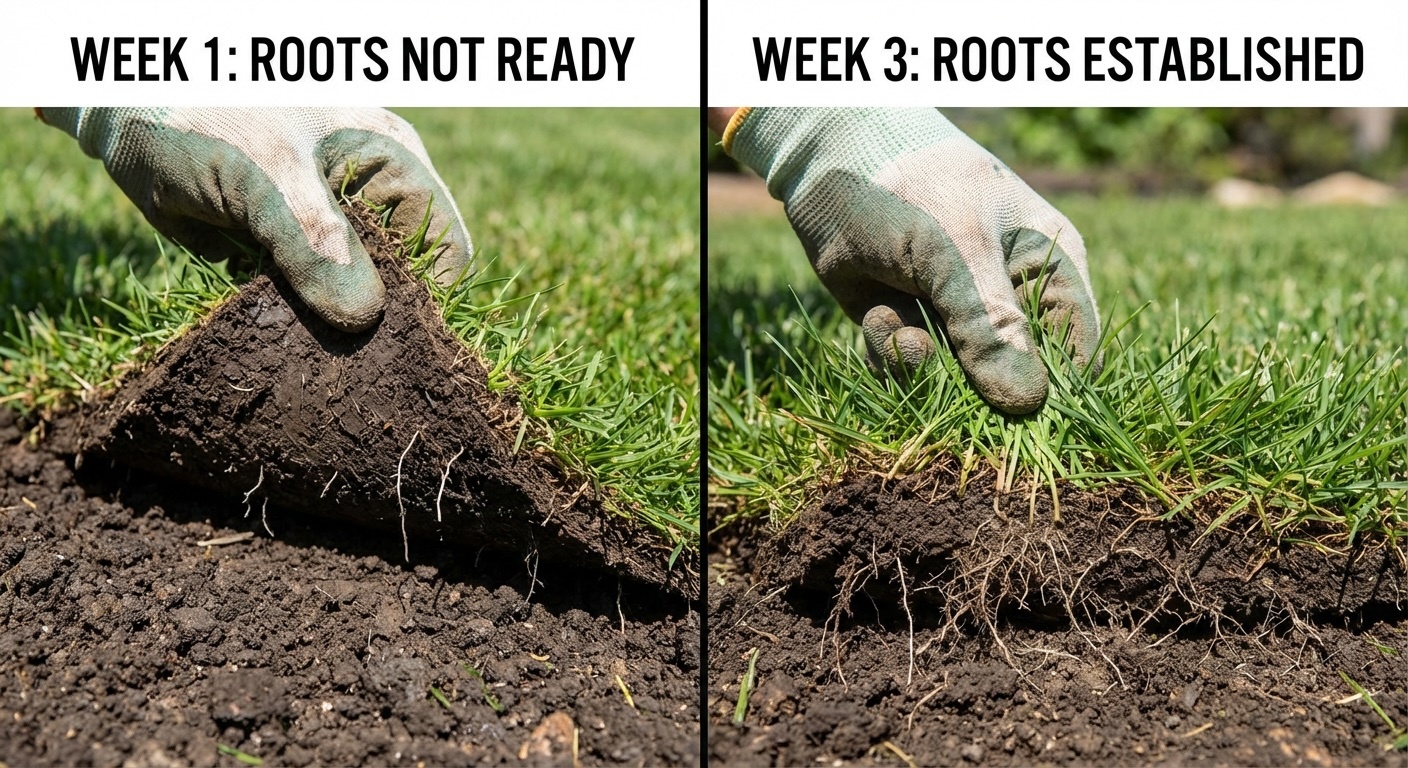
The First Mow
- When: After about 14-21 days, perform the "tug test." Gently tug on a corner of the sod. If it holds firm, it's ready to be mowed.
- How: Set your mower to its highest setting. Never remove more than 1/3 of the grass blade height in a single mowing.
Common Rookie Mistakes to Avoid
- Choosing the Wrong Grass Type: Not all grass is created equal. A shade-loving St. Augustine will fail in a full-sun Arizona backyard, and a heat-loving Bermuda will struggle in the cooler temperatures of the transition zone. Do your research and choose a grass that is well-suited to your climate, sun exposure, and soil type.
- Ignoring Soil Test Results: A soil test is like a blood test for your lawn. It tells you exactly what your soil is lacking. Ignoring the results and blindly adding fertilizer is a recipe for failure. If your soil pH is too high or too low, the grass won't be able to absorb nutrients, no matter how much you fertilize.
- Laying Sod on a Slope Without Securing It: If you're installing sod on a steep slope, secure it with sod staples or stakes. Otherwise, the first heavy rain will wash your investment right down the hill.
- Watering at the Wrong Time of Day: Evening watering, especially in humid climates, can promote fungal diseases. The best time to water is early in the morning, between 4 a.m. and 10 a.m. This gives the grass blades time to dry before nightfall.
- Installing on a Hot, Windy Day: The sod will dry out faster than you can water it.
- Leaving Gaps Between Pieces: The edges will dry out and die, creating a grid of brown lines.
- Fertilizing with the Wrong Product: Do not use "weed and feed" or any pre-emergent herbicides on new sod for at least 60 days. It will kill the new roots.
Final Thoughts: Is DIY Sod Installation Worth It?
Installing sod is a significant investment of time and money. But unlike many home improvement projects, the reward is instant. One day, you have a dirt patch; the next, you have a beautiful, finished lawn.
By following these steps and embracing the unforgiving nature of the process, you're not just laying grass. You're building a living system from the ground up. You're ensuring that your investment pays off, not just for this season, but for years to come.
It's hard work. It requires patience. But when you're sitting on your new, lush lawn, enjoying a cold drink on a warm evening, and your kids are running barefoot on the grass you laid with your own two hands, you'll know it was worth it.
Ready to transform your lawn? Get a personalized quote from USA Sod and connect with our network of trusted local installers.
Key Takeaways
- Soil prep is non-negotiable. Tilling 4-6 inches deep and adding compost is the most critical step for long-term success.
- You cannot install sod over existing grass. It will die. You must start with a clean slate.
- The 30-minute rule is real. New sod roots can die in as little as 30 minutes on a hot day. Water immediately.
- Rolling is not optional. A water-filled roller is essential to eliminate air pockets and ensure root-to-soil contact.
- Watering changes after 2 weeks. Shift from frequent, shallow watering to deep, infrequent watering to encourage deep root growth.
- The "tug test" is your guide. Don't mow until the sod can't be pulled up from the ground.
FAQs: Your Sod Installation Questions, Answered
What are the most common sod installation mistakes? [1]
- Not Preparing the Soil: Laying sod on hard, compacted soil is a recipe for failure.
- Leaving Gaps Between Pieces: The edges will dry out and die.
- Not Watering Immediately: The 30-minute rule is not a suggestion.
- Mowing Too Soon or Too Short: This stresses the new grass.
- Fertilizing with the Wrong Product: "Weed and feed" products will kill new sod.
How long does it take for sod to root?
With proper watering, sod should start to root in 7-14 days. You can check by gently tugging on a corner of the sod. If it holds firm, the roots are starting to establish.
Can I just lay sod over existing grass?
No. You must remove all existing grass and weeds before laying new sod. The new roots need to make direct contact with the soil to establish properly.
What should I put down before laying sod?
You should till the soil to a depth of 4-6 inches and add a 1-2 inch layer of compost or other organic matter. A starter fertilizer high in phosphorus is also recommended.
What is the best month to lay sod?
For warm-season grasses, the best time is late spring to early summer. For cool-season grasses, early fall is ideal.
How often should I water new sod?
For the first 1-2 weeks, water 2-3 times a day to keep the sod and the soil beneath it consistently moist. After that, you can gradually reduce the frequency.
How much does it cost to have sod installed?
The cost of professional sod installation typically ranges from $1.50 to $3.00 per square foot, depending on the type of grass, the size of your lawn, and your location.
Should I fertilize new sod?
Yes, but only with a starter fertilizer that is high in phosphorus. Do not use a regular fertilizer or any "weed and feed" products for at least 60 days.
Can you walk on new sod?
Avoid walking on new sod for the first 1-2 weeks. After that, you can walk on it lightly, but avoid heavy foot traffic for the first 30 days.
How do I know if my new sod is getting enough water?
Lift a corner of the sod. The soil underneath should be damp, but not soggy. If it's dry, you need to water more. If it's soggy, you need to water less.
References
- Purdue University Extension. (2017). Establishing a Lawn From Sod (AY-28-W). https://www.extension.purdue.edu/extmedia/ay/ay-28-w.pdf
- University of Nebraska-Lincoln Extension. (2012). Establishing Lawns From Sod. https://go.unl.edu/lawn-sod
- University of Arizona Cooperative Extension. (1999). Sod Establishment for Arizona Lawns. https://turf.arizona.edu/tips699.htm